LIGHTNING AND SURGE PROTECTION
Lightning is one of the main causes of fence controller failure. There are some precautions you can take against lightning and AC power surges. Disconnect the controller from the fence line and power source when storms are near. ( Caution: never disconnect or approach a fence during a lightning storm. ) Install a lightning diverter ( commonly referred to as a lightning arrestor) between the fence and the fence controller. This will divert the electricity from lightning strikes, induced on to the fence, to the earth before it does any damage to the controller. Lightning diverters do not arrest or stop the flow of current from a lightning strike, they direct the flow of current into the ground when properly installed. Lightning diverter, part # 07106.96, is recommended for all types of fence controllers.
You can also protect 105-125VAC fence controllers from electrical surges on the utility side by installing a surge suppressor. The suppressor is plugged into the outlet and the controller is plugged into the suppressor.
For Low Impedance controllers, the STORM GUARD has proven to be very effective in protecting the controller from fence line lightning strikes. STORM GUARD, part # 01667.92, can be used with any low impedance controller rated at 1 joule of energy output or greater. The STORM GUARD attaches directly to the controller and will suppress high voltage lightning surges induced on the fence.
A quick way of disconnecting the fence from the controller before storms occur would be installing a Cut Off Switch, part # 07111.96. It also makes it convenient for working on a fence line. You don't have to unplug the fencer at the power source.
The Spring Gate Assembly, part # 07108.96 is also a protection device. Besides being a convenient way to open and close gates, it serves as a lightning choke by dissipating a lightning surge as it travels down a fence line.
Using these types of protection will minimize the possibility of your controller being damaged from lightning or power surges, but if you live in an area of frequent electrical storms be sure to have a spare fence controller as a back-up.
LIGHTNING DIVERTER INSTALLATION
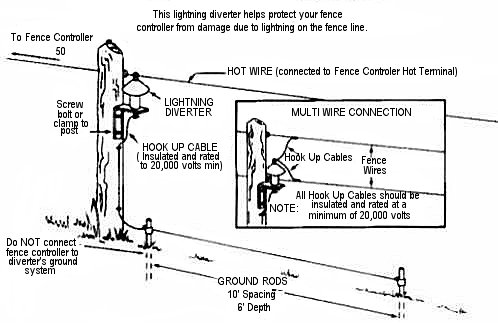
This lightning diverter helps protect your fence controller from damage due to lightning on the fence line.
INSTALLATION
1. For a single wire fence, connect the lightning diverter to the fence wire before mounting on to the fence post. Unscrew the top nut from the lightning diverter, removing the washer and nut. Position the lightning diverter against mounting post with the fence wire passing through the split nut at the top of the lightning diverter shield. Tighten the top nut ensuring that the fence wire is not strained. Then secure the lightning diverter to the fence post.
2. Where more than one fence wire is hot, first mount the lightning diverter on to the fence post before connecting hook up cables ( rated to 20,000 volts) to each of the hot wires using line clamps. Unscrew the top nut and pass the hook up wires through the split nut and tighten to secure.
3. Connect ground wire by attaching hook up wire to bottom nut by winding in a clockwise direction and securing nut. Attach other end of hook up wire to ground system with ground clamps. Diverter ground system should consist of a minimum of two 6-ft. ground rods spaced 10 feet apart and 50 feet from fence controller ground system.
4. For greater protection, install lightning diverters on all corners of fence. First lightning diverter should be installed no closer than 50 ft. from fence controller.